Showing posts with label decorating. Show all posts

Tuesday, November 22, 2011

Re-post: Party Decor All Year Round

I have boxes, drawers and bags full of random odds and ends left over from parties. It can be difficult to figure out what to do with all these things, and I hate to throw things away-although I do donate things to charity a few times a year. This article from Apartment Therapy lists party items that can be re purposed.
I am loving the succulent wreath, the CB2 glass globe candle holder and the birch tree jewelery stand.


I've been doing lots of theme parties lately, and this inspires me to rethink re purposing common household items when decorating for parties, rather than buying new things all the time.

Click here for the link to the full post:

 Succulent Wreath, Viva Terra


Little Birch Jewelry Stand, Urban Outfitters

Whirly Hanging Candleholder, Cb2

 Images source: http://www.apartmenttherapy.com

Monday, September 12, 2011

Fall Texture

 I've been watching alot of episodes of Sarah Richardson's shows on HGTV lately, and one thing that really stood out for me was all the different textures and patterns she uses in her designs. In one episode she mentions that she often uses 14 different textures, patterns and fabrics in one room. 14! I looked around my house, to see how many I have, and the answer is very few. Fall is the perfect time to add layers of plush fabrics and natural textures around the house, so I set out to see how I can add a bit of autumn to my living space easily and frugally.


I picked up two bags of textured balls from the dollarstore. There's about five balls of different sizes for $2 per bag. Which works out to about 40 cents each. I couldn't decide which I liked better, so I got both. Why not? Next, I scrounged up a bowl and a vase and tried out some different arrangements to see what I liked best.

 
This bowl looks like teak, but it's actually plastic! That make it very washable and durable. I've had it for years, I found it in a thrift store for $1. I piled the textured balls inside the bowl casually. Not bad, but the individual balls get lost in the heap. 


Next, I grabbed a vase that has been collecting dust, and spent some time figuring out the best look. Since the vase is narrow at the base, with a fluted top, it works best with smaller balls in the bottom, one larger one in the middle, and then some more small ones on top. Much better than the bowl, since the glass is translucent, all the balls are visible.


One a recent trip to Ikea I picked up two faux sheep skin rugs, for $9.99 each. Bonus-they are machine washable. They're meant for floor coverings, and have non-skid nubs on the back, but so far I prefer them as throws.  They are lovely and plush. I bought two, as I anticipated the cat would bogart one, which is of course exactly what happened.


Also at Ikea, I added an apple scented candle to my cart, to add a layer of scent to my autumn mini makeover.


Accessories are the easiest way to change up the look of a space without commitment, and for little money. These little shelves above my couch are great. I got them at Canadian Tire, for $20 for the set of three. I can rotate items around whenever I like to change the look. Candles, a handmade wooden box, and some other small accessories add personality and dimension. The grey sculpture in the middle was only 50 cents on clearance!

Friday, April 15, 2011

Easter Eggs

I've come across some very beautiful and interesting egg dying techniques this week, that use common things that are inexpensive. Did you know you can use fruits and vegetables to create dyes? If you want to eat your Easter eggs (I never actually do) natural dyes are great, no worries about possibly ingesting chemicals. I've been doing some research on common things that you can dye with. Add any of these ingredients to boiling hot water, the longer you simmer it, the stronger the dyes. Natural dyes take longer, it seems at least 30 mins, to up to 2 hours, so you have to be patient. Except for the onion skins, add a teaspoon or so of vinegar, it will help set the dye.
  • Yellow onion skins=rust orange
  • Red onion skins=purple
  • Tumeric=golden yellow
  • Coffee or tea=beige to brown, depending on how long it sits
  • Beets=red or pink
  • Red cabbage leaves=blue
  • Grape juice=purple
Source: http://bigsislilsis.com/2010/04/02/natural-dye-colored-easter-eggs/

I love these eggs, the rust colour is stunning. The designs are made with flowers and leaves. For information and the instructions on how to do this, check out it out here.

Another tried and true method is to use hot water, food colouring and a teaspoon of vinegar per colour. It's much faster than natural dyes, and you can get really intense colours. Add drops of food colouring to small containers of water until you are happy with the shade. Then add two more. That should be about right.

Source: http://www.marthastewart.com/how-to/marbelized-eggs#slide_6
 For an interesting marbled effect add some oil to the dye and swirl the eggs around.

http://www.marthastewart.com/photogallery/egg-dyeing-101

 To add decoration and patterns, the easiest way to do it is with the wax resist dye method. Draw patterns with a white wax crayon. When you dye the eggs, the dye won't stick to the wax, that part will stay white.
Use the mask method: Try wrapping the eggs with flat dental floss, rubber bands or strips of masking tape. Stickers are great to add words or shapes. If you want to do multiple colours, start with the lightest colour first and gradually add the darker colours. Keep in mind the rules of colour mixing-so you don't end up with grey, brown or muddy colours (unless that was on purpose).

Red+Blue=Purple, Red+Yellow=Orange, Yellow+Blue=Green, But Purple+Orange+Green=Muddy Brown


One last tip-keep the egg carton handy to allow the eggs to dry before handling. Use a spoon to lower the eggs in and out of the dye, so you don't get dye all over your hands.

For more information and ideas, I suggest Martha Stewart's website-tons of inspiration.

Be creative and have fun!

Thursday, March 31, 2011

Re-post: Ladder Tablescape

Isn't this fabulous? I love it for several reasons:
  • re-using an older ladder, eco-friendly and maybe even free
  • love the use of photographs
  • the graphic punch of the hits of red in the black/grey/cream colour scheme
  • love the x's and o's 
This table setting is for a wedding reception, I think it's in an art gallery-love!  I can think of so many other events this could apply to-an engagement party, anniversary, milestone birthday.

 source: http://www.re-nest.com/re-nest/green-style/green-style-a-ladder-as-a-dining-table-overhead-hanging-141529

Monday, December 13, 2010

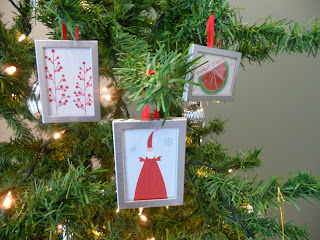
Photo Frame Christmas Ornaments


Supplies:
  • small photo frames
  • old greeting cards/ scraps of wrapping paper
  • pencil
  • cutting tools-such as paper cutter, scissors or xcato knife
  • hot glue gun and glue sticks
  • 1/4 inch satin ribbon
In keeping with the theme of re-using things I already own to decorate for Christmas, I made these cute little photo frame ornaments on Saturday. You may recognize the silver frames-they were the place cards/guest favour at my wedding. I originally bought these ones online from a wedding favour site, but I have seen them at Solutions and Kitchen Stuff Plus. You might find some at the dollarstore/craft store. For reference, they are about 2.5 by 2 inches.


This is a very easy and quick craft. My plan was to use scraps of wrapping paper-but it turned out only one pattern was the right scale for the frame. It happens to be the pattern I used for the "table cloth" in last week's post. So, I scrounged up some old greeting cards from last year with fun graphics to fill in the other frames.


Step one: isolate what area of the paper or card you want to frame. I took apart the frame and moved it around until I was happy with the image. Next mark the edges with the pencil. I used my small paper cutter to quickly trim the image to fit inside the frame.


Step two: flip the frame over. You can see the magnet at the back. I attached a small piece of satin ribbon to the back to make a loop, with my glue gun. You need about an inch or so for each frame. This ribbon was a scrap I saved from a gift box last year. Attach the ribbon at the top of the frame for portrait, or at the side for landscape-depending on the image you choose.


Step three: Put the frame back together, and there you go! There are so many options, you can customize the image to suit your decor.

Many people I know like to alternate themes from year to year. Keep the frame and swap out the image. Why not photocopy family pictures in black and white? Sure to be a conversation starter at Christmas dinner. It's also a nice way to commemorate a special event such as a wedding, a new house or baby's first Christmas. I am going to keep this idea going and change the images from year to year.

Wednesday, December 8, 2010

Easy and Frugal Table Setting


Here is how I made an easy and affordable holiday table setting using things I already had around the house.

Step 1:
Create a table cloth from gift wrap. I already owned this paper, I just unrolled and cut to the size I wanted. If you have a dark wood table like mine, you might want to let some of the wood show through. I left a space on all sides. Next, I folded the cut edges under and taped them down on the underside for a cleaner look. You can cover the entire table if you are worried about spills, scratches or hot dishes marring the surface. Other options: create a runner down the table or cut out rectangles for individual place mats.

Step 2:
I set the table with my basic white plates, cutlery and wine glasses.


Step 3:
I already had this centrepiece, it was one I used at my wedding in May. The set comes with the mirrored tray, the square vase and the round candle holders. I simply added the silver glittered foliage (from the dollarstore) and some clear crystals. If you want to create this look-any piece of mirror will do. You can find the other items at any dollarstore-the vases, the foliage, the crystals and the tea lights. Adapt the centrepiece to suit your theme. An even more affordable idea-collect fresh greenery from outside.


Step 4:
I simply rolled basic white napkins and tied with a length of satin ribbon. I prefer knots to bows. If you like, tuck a sprig of greenery under the ribbon.

Step 5:
Place cards are optional. For a small table like mine, you don't need them but I wanted to include them anyway. I simply used a pinecone and a small rectangle of paper. Couldn't be easier. I bought a whole bag of pinecones, but by all means collect them outside if you live near pine trees. Just be wary of any sap residue. These ones are spray painted white in some areas, that can easily be done if you want to add a bit of pizzaz. Or dab on some glue and sprinkle glitter on top.


That's it! If you start with basic white dinnerware, you can add details in any colour scheme you like. A good general tip is to stick to no more than four colours. A nice thing about using wrapping paper is that everyone has it at Christmas time and it comes in a multitude of colours and patterns. For a kid's table, lay down kraft paper and give out crayons.

*I did recycle the paper I used, I wrapped a large gift with it later the same day.

I was so pleased with the results, I continued to decorate other areas of my apartment with gift wrap. The colour scheme is red, white and silver. I chose paper in different prints, but they are all the same colours, so the overall scheme works.

This is actually an office armoire, but it looks like a buffet. I simply laid out the paper and cut to the size I wanted. I decided to cover the entire surface. I folded under the edges and taped them down on the underside, same idea as the tabletop. The armoire is my entrance way-it's nice to jazz up the front hall or foyer to greet guests with Christmas cheer. For a party, I would set this up as the bar or hors d'oeuvres station.


This arrangement was created from elements I already had. I dug through my bin of Christmas stuff and pulled out a silver charger plate and a red pillar candle. Next I added some more pinecones. It needed a bit of sparkle-this is a snowflake ornament that is too big for my small tree. The vase is a smaller version of the one on the table. I had one more piece of foliage leftover from the centrepiece. The stack of gifts are actual presents waiting to be delivered.

This shelf is in my hallway, and it is one of the first things visible upon entering the apartment. Normally it looks like this:


Lovely, but not very Christmas-y, is it?

So, I simply wrapped the framed prints to make them look like gifts! So easy.


A bit of coordinating ribbon, and there you go. I think it looks great. I love the graphic punch of the prints. The paper and ribbon are all from Ikea, if you are wondering. I left the lengths of ribbons long enough that I will be able to re-use it to wrap gifts next year. The ribbon on the two smaller prints is actually tied at the back. The little red bow is meant to decorate a wine bottle, I just taped it to the white ribbon with double sided tape. Double sided tape is fantastic, I use it to wrap gifts all the time.

It seems like I used alot of paper, but I didn't really. I have plenty leftover to wrap gifts. I even have an idea on how to re-use scraps of gift wrap-all those pieces that are too small to wrap gifts but too nice to put in the recycling bin. Keep an eye out-I am going to the craft store tomorrow to get the things I need.

Happy Decorating!

Tuesday, November 2, 2010

Clown Fish Pumpkin


From this...


To this!


Materials:
  • pumpkin, preferably medium sized and fairly round
  • cereal boxes or other thin cardboard
  • bamboo skewers
  • craft glue
  • scotch tape
  • craft paint: orange, black and white
  • permanent black marker
  • dark and light blue tissue paper
  • white card stock or bristol board
Step one:
Wash and dry the pumpkin. Once it is thoroughly dry, figure out which side is the face. On the opposite side (the tail) draw a circle with black marker. Draw some stripes on each side. Draw two eyes and a mouth, The eyes look best oversized. Then draw a large circle around the entire face.

Step two:
Fill in the black stripes with white paint. Fill in the eyes and the mouth. Two or three coats will be needed. One the eyes are dry, paint in the pupils.


Close up shot of the face

Step three:
While the paint is drying, draw out the shapes for the two sides fins and the tail. I based the size of the fins on the size of the pumpkin. Took a bit of trial and error until I was happy with the shape of the fins.


Make two drawings of each piece (the fins will be double sided). Paint all the pieces orange. When the base layer is dry, outline with black and add black lines, shown in the pictures. You will need one dorsal fin (the top), two side fins, and a tail. In this picture I also made some extra front fins, but I didn't end up using them.


Flip one half of each fin over. Tape bamboo skewers to the plain side. I used three skewers for the tail, and two skewers for each fin. Add some glue and sandwhich the two halves together. Let dry. Some touch ups of the black lines may be needed. The hard part is over! Assembly is easy, just stick the skewers into the flesh of the pumpkin. Touch up any areas as needed.


Side View

Back View

Optional:

To make the reef:
I used a lazy susan as the base, and wrapped it with dark blue tissue paper. Next I freehand drew the shapes of the coral on white card stock. Then outlined the shapes in black marker and cut out carefully with small scissors. Next I taped the coral shapes to the base, leaving gaps for the tail and fins. Next I layered the dark and light blue tissue, alternating the colours to make a "bed". I set the pumpkin on top, and it was ready to go!