Showing posts with label paper. Show all posts

Thursday, June 16, 2011

Flower Garland and Updated Birthday Banner

I updated the "Hoppy Birthday" banner for my sister in law's birthday.I changed the "o" to an "a" and switched the bunnies for some pink and red die cut flowers. Cute, and it matched the fireplace quite nicely. 
You can find the original instructions to make the banner here 


Here's a close up of the paper flowers. I bought a large package of them at the dollarstore. Very handy, I've used them for greeting cards, embellishments for gift bags, to decorate easter baskets, the garland below and I still have more!

Flower Garland
Materials:
  • paper flowers in your choice of colours
  • needle and thread
  • tape
This is super easy, I whipped it up in only a few minutes.


 Line up your flowers so that you have a relatively straight line, see how the side petals line up? Then simply string the flowers onto your needle and thread from the back side, so the thread runs along the back. Tie off and tape the end to the back of the end flowers. I used a random pattern of all the colours, but feel free to cutomize as you see fit. The only small thing that bugged me-the flowers tended to twist around. A very tiny detail no one would notice except me. I might attach them all individually, like I did with the sweet pea banner when I have some spare time. Sweet pea banner instructions are here
Everyone commented on it, it's a cute way to add a pop of colour to a party.
  And very cheap, it cost only pennies.

Wednesday, April 13, 2011

Spring Shopping Spree

This past weekend I did the Winners tour with my oldest sister and scored some pretty sweet deals. Now that spring is here, it's time for colour!


Here's what I scored: a dark teal open front cardigan with rosette appliques, on clearance for $15. Can't really see it in the image, it's the blob on the upper left of the photo.
A fantastic purple Sparrow True handbag marked down to $29 from $59.99.
A scrapbook for $10 and a kirigami craft kit for $5.99.
Pretty sweet deals, huh?  As soon as I got home, I switched from my brown suede handbag to the purple one. Love coloured handbags in the spring/summer. I have been intending to do a scrapbook of vacation photos from Mexico and Cuba and have not found the right cover yet, but this one is perfect. Can't beat the price either. It's a 12x12 format, and I already have tons of scrapbooking paper and doodads.

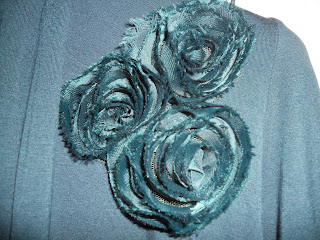


Here are better images of the cardigan. The colour is a bit off in the photo, but it's close enough. I love the versatility-it can be worn open, tied to the side, or tied in the front. It's casual enough for jeans and ballet flats, or can be dressed up with dress pants and heels. Just because something is on sale, doesn't mean it is always are great deal. I always think about care-it is machine washable, will it wrinkle? And if  I can think of three other things I can wear it with, and at least two places I can wear it to, then I will get it. If not, I don't buy it even if I love it. Otherwise I won't end up wearing it.


 The kirigami kit is really cool, I'd never heard of it before.  Kirigami is related to origami, the Japanese art of folding paper but Kirigami uses cuts as well as folds to create intricate and beautiful designs. The kit includes the instruction booklet, a folding guide, tracing paper, a slew of coloured papers and scissors. All for $6, can't beat that for value. And since I recently broke the handle of my favourite craft scissors, it was too perfect to pass up.

Some of the designs-aren't they neat?

The project guide includes awesome tips and ideas. Both for home decor and entertaining. Here are some of the pages:


I am going to use the designs in my new scrapbook-the tropical floral designs will be the perfect complement to my Mexico images. I also love the photo matte-I'll try that one too. There are so many uses-to add pizazz to basic white dinner ware, string them together for garland. There are a few three dimensional projects too, one is a hanging decoration/mobile, as well as the paper butterflies shown on the cover. Can't wait to start folding and snipping away.

I always start at Winners first when shopping, especially for gifts. I can always find something fantastic at a great price. I suggest going with a friend, filling a cart and trying everything on. You never know until you try it. Rummage through the stationary and home section too, good deals abound.

Happy Shopping!

Friday, July 23, 2010

DIY greeting cards and invitations

Materials needed:
  • pre-made envelopes, in any size
  • variety of decorative papers-I used scrapbooking paper
  • embellishments: die cuts, glitter, stickers, scraps of ribbon, etc.
  • glue stick
  • glue gun for thicker elements (if using)
  • bone folder (optional)
  • cutting mat and xcato knife or paper cutter

The only essential aspect of making your own cards is making sure they fit into the envelopes.
Other than that, let your imagination run wild!


Craft stores sell blank card and envelope sets. This project is even easier with pre-made cards, just decorate! Each card takes only a minute or two.

If you are making invitations, you will likely want to make them all the same. I don't think this is strictly necessary-your guests won't compare them! But it is easiest to make them all the same colour scheme, you can vary the patterns and shapes if you like.

For invitations print out all the details such as date, time, location and the contact information for the guests to rsvp and print out as many copies as you need from your home computer.
Glue this sheet into each invitation.

This is really a creative exercise, you can make cards and invitations in any colour scheme and pattern you like.

Here are some samples I created using leftover scrapbooking supplies and bits and bobs I had lying around the house. I confess I save ribbon-I have a drawer full of random pieces.


This could be an invitation or a card for a wedding, an engagement party, a shower, or an anniversary party.


This card or invitation is more general-it could be for birthdays or as a thank you card.

It really only takes a few minutes to make a card and it's a really nice way to create a hand made custom card. Tailor the card to the person it's for, the event, or even to the wrapping paper.

Most of all-be creative and have fun!