Friday, October 22, 2010

Pumpkin Coach


I made this coach for a pumpkin carving contest. Proceeds were donated to the United Way (it cost $5 to enter the contest). I won second place. Here's how I made it.

Supplies:
  • 1 pumpkin, as round as possible
  • a pen or marker to draw on the pumpkin
  • knife and tools to clean and carve the pumpkin
  • a toy horse (this one is a Bratz Dolls horse)
  • craft paint ( blue and metallic silver)
  • paint brush
  • ribbon
  • 2 small photo frames for windows
  • craft feathers
  • hot glue gun and glue sticks
  • crystal paperweight (turned upside down)
  • spokes and wheels (I used plastic parts that are used for store displays)
  • Optional: Princess Doll
  • Optional: light source (candle, small flashlight, flameless candle, etc)

Step one: Turn the pumpkin upside down. Draw the shapes of a lid, two windows and a door. I made the door oval, but it can be any shape you like. I used the frames as guides for the shape of the window, I traced around the frame opening. When you are happy with the layout, carve out a lid and hollow out the pumpkin. Carve out the windows and door.

Step two:
Paint the pumpkin, including the lid. Acrylic craft paint works, but spray paint is faster. Multiple coats may be needed. I added some metallic silver paint along the ridges of the pumpkin as higlights.


Step three: Hot glue the feathers to the underside of the lid. Hot glue the small frames to the windows. I outlined the door with white ribbon trim and added a small scrapbooking doodad to the top of the door. The crystal I used for the top of the coach had a pointed bit on the top, so I turned it upside down and carved a little hole to sit it into. I hot glued it into place.


Step four: Make some wheels. This is the trickiest part of the whole project-how to get the pumpkin to sit on the wheels. I don't have a picture of the construction, but I made a sort of webbing with ribbon. I tied ribbons around the spokes of the wheels to form a sort of basket for the pumpkin to sit on. It took quite a bit of fiddling and trial and error to get it right. You could also use the wheels meant for toy cars- hobby stores usually have them. Empty spools of thread and wooden dowels might also work. The pieces I used are black pastic. I painted them silver, you can see from the picture the paint didn't quite stick. I then drew the spokes on the wheels with a black marker.

Step five:
Attach the horse. I used some white ribbon, and simply attached one end to the saddle that came with the toy, and the other end to the spokes of the wheels.

If I was going to make this project again, I would buy the horse first. As you can see, the scale is totally wrong. That horse is a giant! I would also buy some model car wheels that I could poke into the pumpkin itself. The ribbon contraption worked, but it required alot of fiddling and didn't look as nice as I wanted.

But all in all, it worked out quite well.


Tuesday, October 12, 2010

Autumn Inspiration


The fall leaves were impossible to miss this morning. The reds and oranges have arrived! Joining up with the yellows to create the most fabulous palette.

In honour of those leaves, check out my new board over at pinterest.com. Click here.

The best things about fall: taking sweaters and scarves out of storage, apple cider, hot chocolate, crisp air and walking through fallen leaves.

Thursday, October 7, 2010

Medieval Theme Birthday Party

Boy's Seventh Birthday Party

*to protect privacy, no names or pictures of guests are included in this post

Date: Saturday October 2, 2010
Location: Casaloma, Toronto ON
Guests: 15, ages 6 to adult
Theme: Medieval
Budget: $500


Details:
The party package available at Casaloma includes:
  • 2 hours
  • up to 12 children
  • admission to the castle and grounds
  • rental of the Austin Room for your private event
  • party supervisor/tour guide
  • 1/2 hour guided tour
  • 2 photo cut outs for photo opportunities
  • craft activity (make and decorate paper crown)
  • lunch (we had grilled hot dogs and chips)
  • juice and water
  • cost-$450, additional food and guests extra
  • guests are able to bring their own birthday cake/cupcakes
*note: all decorations must be free standing, no taping or adhering any decorations to the walls is permitted


Decorations

  • balloon bouquet
  • paper castle centrepiece
  • dragon pinata
  • craft foam shields
colouring pages and paper crowns
Activities:
  • make a paper crown
  • guided tour
  • dragon pinata
  • cut outs for photos

Dragon pinata


King and Queen cut outs
Lootbags

Taking advantage of the photo cuts, I took a photo of each child with the cut out. While the kids were taking the guided tour I printed out each photo with my portable photo printer. I picked up red and blue foam 4 x 6 picture frames from walmart. Very affordable-a pack of 2 costs $3.50. I put the pictures inside the frames for the kids and tucked them inside their lootbags. Inside the bags, I put a handful of foam craft stickers-castles, stars, swirls, hearts, so the kids could decorate the frames at home. I also threw in a handful of candy. After all, what's a lootbag without candy?


Photo station

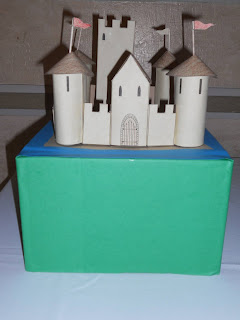
Medieval Theme Decorations: Paper Castle Centrepiece

The template for this paper castle comes from Storm the Castle. The template and instructions can be found here.

Supplies:
  • 4 toothpicks
  • 4 toilet paper tubes
  • thin cardboard, I used old manilla folders
  • paper-I used parchment coloured paper
  • crayons or water colour paints
  • glue
  • template from Storm the Castle
  • printer
  • scissors
  • stiffer cardboard for the base
I followed the instructions from Storm the Castle. I coloured some elements of the castle with crayons before cutting out the pieces. I like the subtle and rustic markings of the crayons, which worked well with the parchment paper.

I used an old paintbrush to thinly spread out the glue, this helps to avoid wrinkles and bubbles.


The base is made from a small box. I cut off the top flaps, turned the box upside down. I glued bright green paper around the edges of the box to simulate grass. Next, I glued the castle to the box. I cut out some wavy blue shapes to serve as a moat around the castle. I glued those down on top of the base of the castle, lining the straight edges up with the edges of the box.

The paper castle is another inexpensive craft, but it does take a certain amount of precision to get it to look right.

Try it out and have fun decorating it!

Medieval Theme Decorations: Dragon Pinata

Paper Mache Dragon Pinata


The Birthday Boy specifically asked for a pinata. I found the instructions for this awesome dragon pinata online, from this site, Storm the Castle. Pinatas are very inexpensive to make, however they do take time. I worked on this pinata over the course of 4 days, allowing the layers to dry in between and before painting it.

Supplies:
  • a balloon
  • newspaper
  • flour and water paste (1 cup flour, 1 cup water, 1 tablespoon of salt)
  • a bowl to prop up the balloon while you work
  • cereal box
  • a paper towel tube
  • tape
  • acrylic paints and brushes
  • string
  • chocolate gold coins (to fill the pinata)
I followed the instructions from Storm the Castle, but added a few of my own details.


I soaked some string in the flour paste and added it to the wings for a three dimensional quality.


I made the eyes from some scraps of craft foam leftover from the shield project. I drew the details with a black marker.


The fire is made from a granola bar box, any thin cardboard will do. I drew out the shape I wanted and painted it to look like fire. I made it double sided, the printed side of the cardboard did not cover well with paint so I glued the printed sides together. It's a bit tricky to glue the fire inside the mouth, I used alot of tape to get it to stay.

The kids loved the pinata! I didn't use a blind fold, they're a bit young. They used a plastic sword to "slay" the dragon. The dragon was filled with gold treasure (chocolate coins). Lots of frantic scrambling and screaming. I made sure the Birthday Boy landed the fatal blow.

Although a pinata is very cost effective, being mostly made from newspaper, there is a time commitment. Start your project early, ideally two weeks before the event.

Tuesday, October 5, 2010

Medieval Theme Decorations: Goblets


Faux Crystal and Gem Goblets


This is the easiest and quickest of all the crafts I made for the party.

Supplies:
Plastic wine glasses (one per guest)
Rhinestone or gem stickers (assorted shapes and colours are best)

Simply attach the stickers to the wine glasses-any patterns or colours you like.
Big hit with the children. One guest remarked "but they're not glass!" Can you imagine a group of seven year olds with glass goblets? Several children took theirs home.

*note: one time only use. The stickers will fall off if you wash the goblet. Or, take the stickers off, wash, and then reapply.

Really affordable craft. One package of 4 glasses is $1. I bought 2 packages of stickers at $1 each. Therefore 8 glasses totals $4, or .50 cents per glass. Plus, I had a lot of gems leftover.

This also works well as a craft the kids can do upon arrival, or during the party itself.