Showing posts with label diy. Show all posts

Monday, December 5, 2011

Re-post: Wrapping paper photo frames

Do you have scraps of wrapping paper too nice to recycle?
Upcycle them into these pretty photo matts.


 Image source: http://www.chatelaine.com

I love this project from Chatelaine. Really easy, and lots of impact. My favourite kind of project. You can find the details here 

It doesn't have to be just Christmas paper, use any paper at all. Metallic paper for black and white wedding photos, birthday paper, floral, graphic. I can think of some many iterations.

Lovely idea for an inexpensive gift, for Christmas or anytime!

Sunday, October 30, 2011

Cinderella's Coach Pumpkin

This is an old project, from Halloween 2009-but I thought readers might be interested in another painted pumpkin project. My sister and I worked on this project together. For many hours. This was the first time either of us had decorated a pumpkin.


Materials:
  • Pumpkin
  • Knife to carve the pumpkin, spoon to clean out the inside
  • Pencil, pen, marker
  • Acrylic paint-light blue, silver
  • Paint brush
  • Glue gun and glue sticks
  • Toy horse
  • Satin ribbon ( I used white)
  • Doll or Figure ( I used a paper cut out)
  • Decorations
  • Candle or light (optional)
Step 1: Select the pumpkin. It has to be the right shape and size, preferably well balanced. Unblemished, if possible.

Step 2: Cut a lid into the top of the pumpkin, and scoop out the insides, the same as you would for any jack-o-lantern.


Step 3: Draw a door and windows as desired, and cut those out.
This is up to you, be creative.

Step 4: Paint the entire pumpkin, multiple coats will probably be needed. Once the base coat is dry, you can add details such as the silver veining I added.

Step 5: Once the paint is dry, add any embellishments you desire. I added some white satin ribbon as trim around the door, scrapbooking frames serves and windows. Use hot glue. I also glued feathers around the inside of the lid, and a crystal knob for embellishment. 


Step 6: Assembly. This the hardest part. Unfortunately I don't have photos of the support structure. Basically I found two "spokes" plastic things that looked like spokes and wheels. Painted them silver, and added spokes with black marker. Then I added a "web" of crisscrossed ribbons and sat the pumpkin on top. Lastly, I attached the horse to the wheels with more ribbon. It's hard to explain, and by all means experiment to see what works. It was alot of trial and error to get it sit right.


Lastly, I added a Cinderella paper doll to complete the effect.
If desired, add a candle or light to illuminate the pumpkin.

Happy Carving! 


Tuesday, October 25, 2011

Re-post: DIY Pacman Garland

Make this awesome Pacman garland for Halloween. Love it in black, but I could also see it in colour.


 Image source: http://www.minieco.co.uk/pacman-halloween-garland/

 The template is free! For instructions and the template, click here

Friday, July 22, 2011

Trend: Tissue Paper Petals

I've been seeing alot of diy projects using  layered tissue paper petals, to a great effect.

Isn't this tablescape so fabulous? So summery! The best part is those lanterns. This project comes to us via Martha Stewart, full instructions are here


 Image source: http://www.marthastewart.com

I think this is a great way to salvage cheaper paper lanterns that are not quite right.  I bought some cheapos once and they were definitely not perfectly round. Perhaps I could have saved them by covering them with tissue paper circles.  Apparently, you can buy the circles pre-cut at craft stores if you are not into cutting out dozens of circles yourself. Paper lanterns and tissue paper is very inexpensive, but what an impact! Great way to stretch your party budget.

I have also seen this method used to decorate pinatas. 


Image source: http://www.younghouselove.com

Here's a tutorial from one of my favourite blogs to read, Young House Love. This pinata was from their daughter's first birthday party.

Image source: http://www.everydaycelebrating.com

If you are not into getting messy with flour and glue,then this very similar project uses a store bought soccer ball pinata and just adds on the tissue paper "petals". Because it's uses a store bought form, it is perfectly round which might appeal to those perfectionists out there (ahem, me).
You can find more photos and instructions here

What a lovely alternative to those gaudy character pinatas you see everywhere in the store. I love the pretty, modern look of these.

Friday, June 24, 2011

Re-Post: Felt Citrus Slice Coasters

Image source: http://www.purlbee.com/citrus-coasters/

Image source: http://www.purlbee.com/citrus-coasters/
Lemon, Lime, Pink grapefruit, Orange 

By now, everyone knows I love felt. Look at these fantastic citrus slice coasters.
Love, love, love!
All you need is some appropriately coloured felt, scissors, pins and a needle and thread. 
The step by step instructions for this project from Purl Bee can be found here

Is there anything you can't make from felt?

Thursday, June 16, 2011

Flower Garland and Updated Birthday Banner

I updated the "Hoppy Birthday" banner for my sister in law's birthday.I changed the "o" to an "a" and switched the bunnies for some pink and red die cut flowers. Cute, and it matched the fireplace quite nicely. 
You can find the original instructions to make the banner here 


Here's a close up of the paper flowers. I bought a large package of them at the dollarstore. Very handy, I've used them for greeting cards, embellishments for gift bags, to decorate easter baskets, the garland below and I still have more!

Flower Garland
Materials:
  • paper flowers in your choice of colours
  • needle and thread
  • tape
This is super easy, I whipped it up in only a few minutes.


 Line up your flowers so that you have a relatively straight line, see how the side petals line up? Then simply string the flowers onto your needle and thread from the back side, so the thread runs along the back. Tie off and tape the end to the back of the end flowers. I used a random pattern of all the colours, but feel free to cutomize as you see fit. The only small thing that bugged me-the flowers tended to twist around. A very tiny detail no one would notice except me. I might attach them all individually, like I did with the sweet pea banner when I have some spare time. Sweet pea banner instructions are here
Everyone commented on it, it's a cute way to add a pop of colour to a party.
  And very cheap, it cost only pennies.

Wednesday, June 8, 2011

Woodland Fairy Party

I saw this party theme idea in the May edition of Paren'ts magazine. In fact, there were lots more of great ideas, all under $100. But this particular one struck a cord with me. I actually saw faux wood grain wrapping paper at the AGO giftshop for 99 cents, but wasn't sure what I would use it for. Now I know!

Isn't the cupcake stand fantastic? Love it.

 Image source: http://www.parents.com

Toadstool cupcakes? Easy and so cute.  I like the use of two different sizes.

 Image source: http://www.parents.com


Image source: http://www.parents.com

I found wings online for $4-$5 a pair.Oriental Trading Company has some monarch butterfly wings, they look pretty awesome. Link is here

I'm sure party packagers and some dollarstores also have them.
The headband and hat are made from paper. 


This theme reminds me of a Midsummer's Night Dream.Older children could dress up and act out scenes from the play. This is a blue sheet with white clouds attached to serve as a photobooth, but could also be the backdrop for the stage.
 Image source: http://www.parents.com

I have the photo printer already to print out the pics, kids can make the frame to take home as a favour.

See the website here for more details and instructions. Lots more themes for both girls and boys of all ages and price ranges.

Tuesday, May 31, 2011

Re-post: Easter Egg Fireflies

This is the cutest thing ever. I had to share. I have an entire bag of these plastic eggs leftover from Easter. What a great summer craft for summer outdoor parties.
Cottage, Camping, Canada Day...


Image source: http://www.ohdeedoh.com


 Image source: http://www.ohdeedoh.com

Put them in the garden, and turn them on at night to suprise the kids.Yellow ones can be bumble bees, pink ones can be lady bugs, blue or green for dragonflies. You could make a whole slew of different kinds of bugs, as well as the standard lightning bugs.

Materials:
  • plastic easter eggs (the ones that open)
  • stickers or googly eyes
  • pipe cleaners
  • duct tape (for wings)
For detailed instructions, click here

Tuesday, May 24, 2011

Re-post: Balloon Garland

 Image source: http://blogs.babycenter.com/life_and_home/balloon-garlands-so-easy-its-crazy/

I love this super easy and fun balloon garland. Another great example of how a simple inexpensive item can be transformed into something fantastic. And this project is super easy. All you need are balloons and ribbon.
Check out the instructions here

Monday, May 16, 2011

Re-Post: Cake Pops

Just the other day I was eying some cake pops in the display case at Starbucks wondering how difficult/easy they are to make. Then I came across this tutorial


Image source: http://aubreyandlindsay.blogspot.com/
 
TimBits! Of course- the perfect size. You can buy the sticks and sprinkles at Bulk Barn. TimBits aren't too pricey, you can get 20 for $1.99 and if it saves loads of time and stress, then it's worth it to me. I am thinking about dipping the donuts in melted white and dark chocolate rather the icing-I don't want them to be super sweet.  I like them as an alternative to cupcakes at birthday parties. If I use timbits, I can offer flavour choices-plain, sour cream, chocolate, etc. I'll have to try it out and see how they go.

http://aubreyandlindsay.blogspot.com/2011/05/5-minute-cake-pop.html

Monday, May 2, 2011

Re-post: Paperbag Butterfly Wreath

Image source:  http://www.bumpsmitten.com/2011/04/diy-tutorial-butterfly-wreath.html


Isn't this wreath fantastic? It's made from brown paper bags, old book pages and coloured paper. I love it .I love the upcycling of paper bags and old books. For extra credit, select literary quotes and cut the butterfly shapes around the words,so you'll still be able to read them.

For instructions on how to make this wreath, check out the tutorial on Bump Smitten here

I just discovered Bump Smitten-a site dedicated to baby showers. But even if you are not planning a baby shower, there are tons of ideas you can use for any other kind of party. For example-an old fashioned ice cream social. Great theme for birthdays, wedding showers, baby showers, family get togethers, etc.
I'll be adding this site to my list of must read blogs.

Friday, April 29, 2011

Hoppy Birthday Banner


Materials:
  • card stock in your choice of colours (2-4 colours)
  • letters (stickers, scrapbooking or cut your own)
  • ribbon
  • glue stick
  • pencil and ruler
  • scissors
I used pre-cut card stock for this project, which makes it easier and faster than a circular garland. I bought a package of pre-cut cardstock in four colours at the dollarstore. Each piece is 61/2 inches by 41/2 inches.
First decide on what you want the banner to say, as well as any additional decorative pieces. Lay out your pieces so you can see how it looks before you start. Once you are happy with the colours combinations, cut our all your letters I used a combination of white, off-white and two shades of  brown. I drew the letters freehand, but feel free to use a template or pre-cut scrapbooking letters or stickers. Lots of options available at dollar and craftstores. Once you like what you see, glue on your letters and embellishments-lining them up all the bottom edge will help it look even.


I added a silhouette of a bunny wearing a party hat to each end of the "hoppy" banner. I cut out the bunny, the triangle and the pom pom from paper and drew the details with a pencil.


Next I made a "pocket" for the ribbon by measuring out an one inch fold and gluing it to the back side. I applied just a thin strip of glue-don't glue the pocket shut. Think of a curtain panel, the ribbon will be like the rod. I used the side of the glue stick to get a very thin line.

Once all the glue is dry, slide your ribbon through each letter, making sure the letters spell out the word correctly and knot the ribbon on each side. I did the banner this way because I wanted to be able to re-use parts of it. I can keep the "birthday" as is, and take out the bunnies and the "o" from "hoppy" to change it to a standard birthday banner instead. Just un-tie the knot and slip off the letters.

It's actually really easy to make a custom banner, they look great and can be customized. Much better than the tin foil ones at party stores. For the instructions on how to make a circular banner, check out the "sweet pea" banner here

 
I am thinking about making some felt garlands and pennant banners, they'll be longer lasting and can be used in various ways for lots of different kinds of events.

Tuesday, April 19, 2011

Easter Pussy Willow Arrangement

Today's idea comes from my Swedish-Canadian friend who sent me this image of a pussy willow arrangment she made. In Sweden it is traditional to decorate branches-typically willow, birch or pussy willow with easter eggs, brightly coloured feathers and fuzzy yellow chicks to celebrate spring.
She also told me a funny story about tramping through her neighbour's field searching for pussy willows in the recent spring snow storm we had on the weekend. The snow was actually blowing horizontally.


This image is so Swedish to me-with the all white background, the brightly coloured decorations and table runner. I hope you find this image inspirational. For another take on the same theme, check out my version with willow branches, a bird and nest and butterflies.

Friday, April 15, 2011

Easter Eggs

I've come across some very beautiful and interesting egg dying techniques this week, that use common things that are inexpensive. Did you know you can use fruits and vegetables to create dyes? If you want to eat your Easter eggs (I never actually do) natural dyes are great, no worries about possibly ingesting chemicals. I've been doing some research on common things that you can dye with. Add any of these ingredients to boiling hot water, the longer you simmer it, the stronger the dyes. Natural dyes take longer, it seems at least 30 mins, to up to 2 hours, so you have to be patient. Except for the onion skins, add a teaspoon or so of vinegar, it will help set the dye.
  • Yellow onion skins=rust orange
  • Red onion skins=purple
  • Tumeric=golden yellow
  • Coffee or tea=beige to brown, depending on how long it sits
  • Beets=red or pink
  • Red cabbage leaves=blue
  • Grape juice=purple
Source: http://bigsislilsis.com/2010/04/02/natural-dye-colored-easter-eggs/

I love these eggs, the rust colour is stunning. The designs are made with flowers and leaves. For information and the instructions on how to do this, check out it out here.

Another tried and true method is to use hot water, food colouring and a teaspoon of vinegar per colour. It's much faster than natural dyes, and you can get really intense colours. Add drops of food colouring to small containers of water until you are happy with the shade. Then add two more. That should be about right.

Source: http://www.marthastewart.com/how-to/marbelized-eggs#slide_6
 For an interesting marbled effect add some oil to the dye and swirl the eggs around.

http://www.marthastewart.com/photogallery/egg-dyeing-101

 To add decoration and patterns, the easiest way to do it is with the wax resist dye method. Draw patterns with a white wax crayon. When you dye the eggs, the dye won't stick to the wax, that part will stay white.
Use the mask method: Try wrapping the eggs with flat dental floss, rubber bands or strips of masking tape. Stickers are great to add words or shapes. If you want to do multiple colours, start with the lightest colour first and gradually add the darker colours. Keep in mind the rules of colour mixing-so you don't end up with grey, brown or muddy colours (unless that was on purpose).

Red+Blue=Purple, Red+Yellow=Orange, Yellow+Blue=Green, But Purple+Orange+Green=Muddy Brown


One last tip-keep the egg carton handy to allow the eggs to dry before handling. Use a spoon to lower the eggs in and out of the dye, so you don't get dye all over your hands.

For more information and ideas, I suggest Martha Stewart's website-tons of inspiration.

Be creative and have fun!

Wednesday, April 13, 2011

Spring Shopping Spree

This past weekend I did the Winners tour with my oldest sister and scored some pretty sweet deals. Now that spring is here, it's time for colour!


Here's what I scored: a dark teal open front cardigan with rosette appliques, on clearance for $15. Can't really see it in the image, it's the blob on the upper left of the photo.
A fantastic purple Sparrow True handbag marked down to $29 from $59.99.
A scrapbook for $10 and a kirigami craft kit for $5.99.
Pretty sweet deals, huh?  As soon as I got home, I switched from my brown suede handbag to the purple one. Love coloured handbags in the spring/summer. I have been intending to do a scrapbook of vacation photos from Mexico and Cuba and have not found the right cover yet, but this one is perfect. Can't beat the price either. It's a 12x12 format, and I already have tons of scrapbooking paper and doodads.

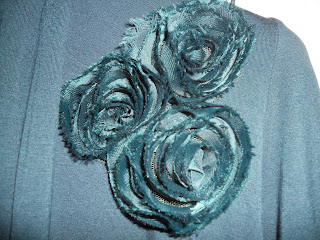


Here are better images of the cardigan. The colour is a bit off in the photo, but it's close enough. I love the versatility-it can be worn open, tied to the side, or tied in the front. It's casual enough for jeans and ballet flats, or can be dressed up with dress pants and heels. Just because something is on sale, doesn't mean it is always are great deal. I always think about care-it is machine washable, will it wrinkle? And if  I can think of three other things I can wear it with, and at least two places I can wear it to, then I will get it. If not, I don't buy it even if I love it. Otherwise I won't end up wearing it.


 The kirigami kit is really cool, I'd never heard of it before.  Kirigami is related to origami, the Japanese art of folding paper but Kirigami uses cuts as well as folds to create intricate and beautiful designs. The kit includes the instruction booklet, a folding guide, tracing paper, a slew of coloured papers and scissors. All for $6, can't beat that for value. And since I recently broke the handle of my favourite craft scissors, it was too perfect to pass up.

Some of the designs-aren't they neat?

The project guide includes awesome tips and ideas. Both for home decor and entertaining. Here are some of the pages:


I am going to use the designs in my new scrapbook-the tropical floral designs will be the perfect complement to my Mexico images. I also love the photo matte-I'll try that one too. There are so many uses-to add pizazz to basic white dinner ware, string them together for garland. There are a few three dimensional projects too, one is a hanging decoration/mobile, as well as the paper butterflies shown on the cover. Can't wait to start folding and snipping away.

I always start at Winners first when shopping, especially for gifts. I can always find something fantastic at a great price. I suggest going with a friend, filling a cart and trying everything on. You never know until you try it. Rummage through the stationary and home section too, good deals abound.

Happy Shopping!

Thursday, March 31, 2011

Re-post: Ladder Tablescape

Isn't this fabulous? I love it for several reasons:
  • re-using an older ladder, eco-friendly and maybe even free
  • love the use of photographs
  • the graphic punch of the hits of red in the black/grey/cream colour scheme
  • love the x's and o's 
This table setting is for a wedding reception, I think it's in an art gallery-love!  I can think of so many other events this could apply to-an engagement party, anniversary, milestone birthday.

 source: http://www.re-nest.com/re-nest/green-style/green-style-a-ladder-as-a-dining-table-overhead-hanging-141529

Friday, March 18, 2011

Craft Project: Spring Tree

 
Spring is finally on it's way! This is the time of year I start craving colour-I add colourful scarves and ballet flats to my winter basics, switch handbags and gravitate towards bright coloured tees and tanks. It's also the time to add pops of colour to your everyday décor. Last night I decided I would whip up a quick spring craft project using some things I already owned and adding a few inexpensive items from the dollar store and craft store. 

Materials:
  • opaque vase or flower pot
  • florist foam 
  • knife and cutting board
  • a stick (this one is willow)
  • dried moss
  • embellishments of your choice-artificial butterflies, birds, nests, eggs etc. 


First, pick a pot. This one I saved from an edible fruit arrangement, I washed it out well and dried it.  You can use any opaque container.


Cut the block of florists foam to fit inside the pot. It doesn't have to be perfect, you may have to use multiple small pieces and fit them together. Doesn't matter-the moss will cover it. I used a serrated knife-it cuts though the foam like butter. 


Shove the stick into the middle of the foam block and make sure it's sturdy. Cover the foam with dried moss. You could also use decorative stones, artificial grass, shredded paper or anything else you can think of. 

Next, wire on your embellishments. The ones I chose came pre-wired. If they do not come already wired, you will need some thin wire. 

I discovered the butterflies were more delicate than I had anticipated. I broke some wiring them on. So in the end, I only used two. One at the top, and one sitting on top of the moss.

The nest was a bit tricky to balance, so I hung it on a lower branch. You could glue it on if it's wobbly. 

 
I love this little bird. So pretty. When picking out the embellishments, I stayed within one colour theme-orange and pink. There are plenty of options out there, in any colour you can think of. Adjust the items according to your décor or taste. 

 
The finished piece! I love the sculptural element of the branch and the whimsy of the little nest and bird. 
I can think of so many other ways to change this piece according to season or theme. Hang little eggs for Easter, add some artificial flowers in the summer, hang miniature fairy lights at Christmas time. Add orange and red leaves for fall, I can go on and on. 

The only problem-my cat wants to eat this! Yes, I had to battle him three times to save the bird. I finally put this way on the top of  the fridge out of his reach. I am going to my Mom's this weekend, so I'll bring it over there. So, if you have toddler or cats this project might not be for you.